Whenever possible I will cite the source; if you find your recipe on here, please email me so I can give you the credit!

Friday, 16 August 2013

The Great Onion Journey

I have never really been able to grow plants. Or keep them alive. I don't know why. I can grow a cactus from a seed, but if you give me an actual plant it'll be dead within a week.

Maybe because cacti require very little attention. If you forget to water them for a month, that's okay! You just give them a whole bunch of water and you forget about them. Probably for another month. They are like snakes, flora snakes. Prickly flora snakes.

Anyway, I was told that if you cut green onions down to the white, then let them sit in water, they'll just grow. That seemed pretty low maintenance, so I figured I'd give it a go.

The results were actually quite surprising. So much so, that I wanted to share this with you. No recipe today, today is more about the journey.

So here it is, a photographic journey of my green onions.

July 2

July 3

July 4 

July 5

July 6

July 7

July 8

July 9

July 10

July 11
July 12
To cut them down, I held the greens together and using a sharp knife sliced through the bunch all at once. Then I just put the pot back in the window and let them grow again. And I made biscuits.

July 14

July 16

July 17

July 18
July 19


Surprising results indeed; especially the part where I didn't kill them.

Each picture was taken as close to the same time, around noon(ish). I couldn't believe how much they grew each day. I recommend you try it for yourself. As you can see it only takes a week.

I didn't really need to put them into a pot with soil, but I felt kinda bad for them; considering my track record, I thought that the one plant that actually grew deserved a pot.

The onion taste (in my opinion) became stronger. I just cut them down again, and found that they had a much more prominent taste. I have also noticed that they are growing much slower. Unless I'm making the biscuits or stuffed potatoes, I don't really use green onions all that often, so this rate seems to be suiting me nicely.

Here it is mid-August and I am on my third cut down of the onions. I have a second set growing in a small baby food jar. Y'know, just in case.

It is important to note, that I have these in a south-east facing window, and perhaps because of that they do require water almost every day.

That's my taste on it.

Wednesday, 3 July 2013

Pizza Muffins

I was at a friend's house earlier this week, and we were making a bunch of muffins for her to take camping for the kids, one of the pages she had marked off was Pizza Muffins.

I couldn't believe it. Not pizza buns, or pizza sticks, but pizza muffins. I gotta say, I was pretty skeptical. It had never occurred to me that a muffin could be savory. The original recipe came from one of those Company's Coming books, I just don't know which one. I suspect it had something to do with muffins.

Anyway, here's what happened in my kitchen:
  • 2 cups Flour
  • 1 Tbsp Baking Powder
  • 1/2 tsp Baking Soda
  • 1/2 tsp Salt
  • 1/2 tsp Dried Basil
  • 1/2 tsp Dried Oregano
  • 1/2 tsp Garlic Powder
  • 1 Egg
  • 1 cup Milk
  • 1/4 cup Oil
  • 2 Tbsp White Sugar
  • 1 Tomato, seeded and finely diced
  • 2/3 cup Cheese, grated; plus extra for topping if desired
  • 1/4 cup Green Onion, finely sliced
  • 1/2 cup Pepperoni, finely sliced

Combine the first 7 ingredients in a large bowl. In another bowl combine the next 4 ingredients. Fold the wet ingredients into the large bowl of dry, mixing well. 

Stir in the remaining ingredients, if you want to have extra cheese on top (and really, who wouldn't?) set that aside for later. 

Preheat oven to 450F, grease your muffin tin. We tried using papers when we made these the first time, and they just stuck to the paper and didn't turn out that well. So I greased the tins the second time and they came out very nicely.

Fill each tin about 3/4 of the way, sprinkle the extra cheese on top.

Bake for about 20 minutes or until a skewer comes out clean.

These are shots from the third batch. The first batch was at my friend's house and I didn't have my camera.

I completely forgot to take pictures of the second batch, because frankly, they are that good and by the time I had realized I needed pictures the muffins were all gone.

So these are the third batch. I used a lot of extra cheese in this batch, because everyone loves cheese. I also didn't have any onions left in the house, so these ones were sans onion. Personally, I prefer them with the onion.

For future batches there are a few things I'm going to try. Basically if it's good on pizza it'll be good in these muffins. Also, simply given the nature of the tomato, it makes the muffin kind of soggy, so I may attempt to replace the tomato with an equal portion of already dried tomato. Like sun-dried tomato, which I'm told actually involves drying tomatoes in the sun.

When baking, I will generally substitute applesauce for any oil that is called for. I didn't do that in this one. You probably could, but I didn't. I am considering replacing the oil with an equal amount of tomato paste, but I think it might make them too tomato-ey. And pink.


That's my taste on it.

Tuesday, 30 April 2013

Country Chicken Sausage Patties

As you all know, I received a new mixer for my birthday this year. There are about a dozen little attachments that are available to buy for this wonderful machine.

With the gift cards I received, I purchased the Food Grinder attachment. It can grind veggies, cheese and meat. Today I used it to grind chicken thighs into a wonderful sausage meat.

I had no idea that there were so many different types of sausage out there. I just assumed sausage was sausage. Apparently that is not so. I don't have casing, so I wasn't able to make actual sausages, instead I made them into patties.

Here's what happened:

  • 3 pounds Chicken Thighs, bone out, skin on (or 3 pounds preground chicken)
  • 3 tsp Kosher salt
  • 1 1/2 tsp Pepper, freshly cracked
  • 3/4 tsp Cayenne Pepper
  • 3/4 tsp Ground Ginger
  • 3/4 tsp Dried Sage
  • 3/4 tsp Onion Powder
  • 3/4 tsp Dried Thyme
If you are grinding your own meat, cut the chicken into pieces that will fit your grinder and grind though on the course setting. 

Add remaining ingredients to ground meat and mix well.

Run mixture through grinder a second time on the finer setting. (At this point, you can freeze the ground mixture, provided you are working with fresh meat. If your meat was pre-frozen, you'll have to cook it through before freezing it again.)

Form meat into patties, this should get you 12 - 14 medium sized patties. Put the patties on a parchment covered sheet, cover and place in the fridge for about 20 minutes; this will help them firm up and keep their shape while handling.

Heat a bit of oil in a pan over medium heat, add the patties and cook through. Cooking time will depend on how thick your patties are.

That's my taste on it.

Thursday, 11 April 2013

Crisp Zucchini Potato Patties

I don't really feel all that funny today, so this post will have a lot less of the usual wit. Maybe it's the weather. Here it is, middle of April, and we are in the depths of a snow storm. The weather for tomorrow? More snow. Saturday? Snow. Sunday? Snow. I hate winter. It dampens my humor.

Anyway, I've had a craving for zucchini lately, but I just didn't know what to do with it. It's not easy to get kids to eat it. It isn't exactly the funnest vegetable. It's certainly not celery. Or carrots (still working through that ten pound bag.)

So I decided to disguise it. Because I'm clever. And sneaky.

After much searching and googling and cookbook flipping, here's what happened in my kitchen.
  • 2 medium-large Baking Potatoes, peeled
  • 1 medium Zucchini
  • 2 Eggs
  • 1/3 cup Flour
  • 1 Green Onion, finely chopped
  • 1/2 Red Bell Pepper, finely diced
  • 1/4 tsp Sea Salt
  • 1/2 tsp Pepper, freshly cracked is best. I used a mixture of pink and white peppercorns
  • Vegetable Oil
Using a regular cheese grater, shred your potatoes and zucchini. You'll want to get as much moisture as possible out. I used paper towel and scrunched it up.

Once your shreddings are pretty dry, add the eggs, flour, onion, bell pepper, salt and pepper. Stir until well blended, or use your hands to make sure it is mixed really well.

Heat enough oil for frying in a large skillet over medium high heat. Form patties with the mixture, about 1/2 inch thick. Fry them in the oil, you may have to do them in batches so they don't crowd together, for 2-3 minutes per side, until they are nicely browned. 

Remove from pan and place on paper towel to absorb excess oil.

I served mine with a warm corn salsa and a chipotle mayo. The mayo was actually just Miracle Whip with some Chipotle spice mixed in. But it was fantastic.


That's my taste on it.

Monday, 8 April 2013

Roasted Herb Potatoes

When I was younger we ate potatoes a lot. My Dad was pretty old school so we had meat, potatoes and veggies everyday. I didn't know any different, from what I remember the potatoes were always boiled.

A giant pot of boiled potatoes, if there were left overs Mom would slice them and fry them up the next night; but then it was boiled potatoes again. We lived on a farm, and I still remember my Mom making a big plate of dinner (mostly potatoes) and then covering it with foil and then packing the kids up, and bringing it out to him in the field while it was still hot.

After I moved out on my own, I never bought potatoes. Even now, I can only think of a couple instances that potatoes even made it into the house.

When they do, I never boil them. Ever.

Unless I'm making gnocchi. And even then only if I'm being really lazy.

Anyway, when I purchased a 2lb bag of "gems", the only water they saw was to wash them off.

Roasted Herb Potatoes are one of the easiest things in the world to make. The amount of attention they require fully depends on how large the pieces are.

For this recipe, you'll need:

  • 1 bag Yellow Gem Potatoes (about 2lbs)
  • 1 Shallot, finely diced
  • Olive Oil
  • 2-3 cloves Garlic, smashed
  • Salt
  • Pepper
  • 1 small handful Fresh Thyme 

Preheat oven to 375F.

Wash and quarter all the potatoes, leaving the peel on. For the super little ones, you can just cut them in half, because quartering them would be overkill.

Toss the potatoes and shallots with some oil, making sure they are all nicely coated. Season with salt and pepper (I used equal parts pink and white peppercorns, smashed up). Stir in the garlic. If you really like garlic, feel free to add more.

Spread the potatoes out on a large baking sheet. If you feel it's necessary, add a bit more oil. 

Take half your Thyme and remove the stems, sprinkling the herb over the potatoes. Lay remaining sprigs of Thyme in and about the potatoes. It'll look really pretty.

Cover with foil and bake for 10-15 minutes. At this point you are going to want to start checking them regularly. Depending on the amount of oil you used, you may need to give them a bit of a toss, so they don't stick to the sheet. As soon as they are soft, remove from the oven. 

For me, I remove the foil after 12 minutes, then start to check them every 2 or 3 minutes. I don't mind if they start to get crispy on the outside.

You can remove the sprigs before serving, or advise everyone at the table to do so.

Tired of Thyme? Use Rosemary, or Dill, or Basil, or any combination you want. Just have fun.


That's my taste on it.

Friday, 5 April 2013

Pretzel Rolls

There is nothing in the world like freshly baked bread or rolls for dinner. Really, it's freshly baked anything. Bread, muffins, cupcakes, you name it.

Soft pretzels are a wonderful little treat, especially when you get them from the street carts while you are out and about, but it has escaped me for years on how to duplicate that flavour. They always turned out more like buns with salt on them. Which is not the same at all.

Having the new mixer in the house has forced me to bake more. I'm not much of a baker, because if I bake stuff, then I'm going to eat it. My interest still lies in cooking, but until I save up some money for the attachments I want, I'll be baking.

In the case of the pretzel rolls, this works out pretty well.

You'll need:

  • 1 1/4 cup Non-Alcoholic Beer, flat 
  • 3 Tbsp Light Brown Sugar
  • 2 Tbsp Milk
  • 2 Tbsp Butter, melted
  • 1 pk (1 Tbsp) Yeast, (quick rise is best)
  • 3-4 cups Flour
  • 2 tsp Salt
  • 4 litres Water
  • 1/2 cup Baking Soda
  • Kosher Salt

Mix together the beer, brown sugar, milk, butter and yeast. Add the salt and gradually add the flour one cup at a time, blend together until a stiff dough forms. 

If you are using a mixer, switch to the dough hooks and mix until dough is smooth, about 8-10 minutes. If you are kneading the dough by hand, turn out onto a floured surface and knead well, 15-18 minutes. If the dough is too sticky in either case, add small amounts of flour.

Place dough into a greased bowl, cover and let rise for an hour or until it has doubled in size.

Punch down, turn out dough onto lightly floured surface and knead for about a minute. Divide into 12 equal sized pieces, shape into smooth balls, place on ungreased baking sheet, cover and allow to rise for half an hour.

Bring the water and baking soda to a boil in a large pot.  Pre-heat oven to 425F.

Add rolls to the water in batches of 2 or 3, cook until they puff up turning them over once. When you remove the rolls from the water, place them on paper towel to soak up the excess water.  

Arrange the rolls on a baking sheet with parchment paper. Cut an X into the top and sprinkle with kosher salt.

Bake for 15-18 minutes or until browned.

If you want to make smaller rolls, adjust the cooking time as required.
That's my taste on it.

Tuesday, 2 April 2013

Cream Cheese Biscuits

For my birthday this year I said I wanted a KitchenAid mixer. In orange. The Man said that this was a reasonable request.

Needless to say, once I found out that the mixer was in hand, I needed to have it now. My birthday isn't for a couple more days. (Just over 38 hours from writing this post, but who's counting?)

Sooo I got the mixer early. I also got a wonderful cookbook specifically for the mixer. For my very first recipe I made Cream Cheese Biscuits*.

You can use any mixer for this recipe, or if you want you can do it without a mixer at all.

  • 2 cups Flour
  • 1 Tbsp Baking Powder
  • 1 Tbsp Sugar
  • 3/4 tsp Salt
  • 3 oz Cream Cheese, cut into pieces (approximately 1/2 cup minus 2 Tbsp)
  • 1/4 cup Shortening, cold cut into pieces
  • 1/2 cup Green Onion, finely chopped
  • 2/3 cup Milk

Preheat oven to 450F. Prepare baking sheet with parchment paper.

Put the flour, baking powder, sugar and salt into mixing bowl. Put in the cream cheese and shortening pieces while mixing on low. Mix until it looks like crumbs.

Stir in the onion. Add milk slowly until dough comes together.

On a well floured surface, knead the dough 10-15 times. Roll out to 1/2-3/4" thick.

Use a round 3" cookie cutter to form the biscuits and transfer to baking sheet. You should get 8-12 biscuits depending on how thick you made them.

Bake 10-15 minutes, until golden brown.

Brush with butter if desired. This isn't necessary but will keep the tops soft if they aren't eaten right away.


Don't really like onion? You can replace the onion with 1/2 cup real bacon bits, or grated cheese, or finely diced ham or pretty much anything your heart desires.

That's my taste on it.

*Original Recipe can be found on page 36 of The Complete KitchenAid Stand Mixer Cookbook published 2012.

Thursday, 28 March 2013

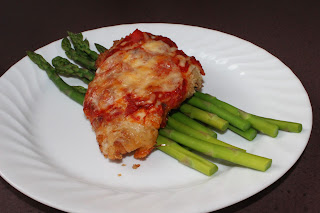
Chicken Roulade with Asparagus

So I wanted to try something new with chicken. Yes, chicken; again. We eat a lot of it. I'd like to say it's because it is healthy for you, or because it's a super tasty meat. But really, it's because we don't have a BBQ and steak without a BBQ just doesn't seem right to me.

Anyway, I found a recipe for Stuffed Chicken Roulade and figured I'd give it a go. The original recipe can be found here.

I mostly followed it as written, but since my computer is a good 20 steps away from my work area, and I didn't bother to write it down -- actually that isn't true; I did write it down, but then I couldn't find the paper I had written it on because my desk has lots of papers on it, and I felt like cooking and not like looking for the paper; so I winged it (wung it?) and just went off of what I could remember.

Here's what happened in my kitchen. The recipe below is for 2 full chicken breasts or a total of 4 Roulade(s).

  • 2 Chicken Breasts, boneless and skinless
  • Salt and Pepper, to season
  • 8 slices Smoked Prosciutto
  • 8 Asparagus spears, woody ends chopped, and trimmed to about 4" in length. (I also peeled them, not because it makes a difference, but because I really like my new peeler.)
  • 1/4 cup Feta Cheese, crumbled

Pre-heat the oven to broil on high. Raise your rack so that it is about 4-5 inches from the heat. Prepare a baking pan with foil and spray with cooking oil.

Slice each breast in half horizontally, so you have two fillets (not two long strips). You may want to put them between two pieces of parchment paper and bash 'em a bit to get them to 1/4" thick. If it has the finger attached, then remove that, it just gets in the way, and you can use it to make something else later. Or fry it up in some garlic butter while you are waiting. Very tasty.

Lay the breasts smooth side down, season with salt and pepper.

Put down 2 slices prosciutto. Put two spears of asparagus sideways so that they stick out on one end, then add about a Tbsp of the cheese.

Roll each one up snugly and place on pan, seam side down. You can skewer them if you want, but it isn't all that necessary.

Spray lightly with cooking oil (not non-stick spray, that would be gross). If you don't have one of those nifty little oil pump sprayer things, just brush it very lightly with oil. Then season the outside with salt and pepper.

Place in oven, directly under the heat. They'll cook in a surprisingly short amount of time. The recipe says 8-10 minutes, but after 10 minutes mine were still a touch pink, so I put them in for another 5. Turn the tray halfway through cooking.

I also (as you may have noticed) forgot to include the Dijon mustard in the stuffing process, probably because I didn't have the recipe instructions right in front of me.

So I made a Honey Dijon sauce and drizzled it over top of each Roulade after plating. The picture doesn't show it, because frankly it wasn't until we sat down that I even realized I had forgotten.

To make a simple Honey Dijon, simply mix equal parts Dijon mustard and Honey, then adjust to taste.


That's my taste on it.

Wednesday, 27 March 2013

Carrot Dill Soup

Soup is one of those things for a dreary day. There is something about them that is just comforting. Chicken noodle when you are sick, spring vegetable as a great starter, you get the idea.

I asked The Man to pick up some carrots for me, mostly so I could make baby food. He came home with a 10lb bag of carrots.

10 pounds. Of carrots.

I was at a loss as to what to do with them. So I made soup. It turned out pretty well.

You'll need:

  • 5 cups Carrots, chopped
  • 3/4 cup Onion, diced
  • 1 cup Mushrooms, sliced
  • 1/4 cup Butter
  • 2 tetra packs Chicken Stock
  • 1 cup Rice, uncooked
  • 1/4 cup Fresh Dill
  • Salt and Pepper, to taste
In a large pan, cook the onion and mushrooms with the butter until tender. Then set aside and allow to cool.

In a large pot, pour both tetra packs of chicken stock, add the carrots. When they start to get tender, add the cup of uncooked rice and bring to a boil.

Reduce heat to simmer, add the mushrooms, onions and remaining butter. Allow to simmer for about 45 minutes until the carrots become really soft.

Remove from heat and allow to cool slightly. At this point you can use an immersion blender or transfer to an upright blender and blend until smooth.

Stir in dill, add salt and pepper to taste.

This makes a very mild soup that is thick and sweet; even The Baby liked it.

If you want something creamy, add cream or whole milk to taste. 


That's my taste on it.

Sunday, 17 March 2013

Actual Chicken Parmesan

I've never actually had Chicken Parmesan. I've heard of it, but I've never eaten it.

On Saturday we had a friend over for dinner, which I was supposed to cook; but my back hurt so badly I could barely stand. So The Man went shopping. We decided if he couldn't find something quick at the store, we would just order Chinese food. He brought home salad and asparagus. And pre-packaged chicken parmesans in a box.

You cook from frozen in the oven for 20 minutes or so.  I had no idea.

I was a little disappointed, I had always heard people rave about this dish, but I didn't think they were all that special. I expressed as much.

That is when our friend turned to me and said, "This isn't actually how they are supposed to be done."

Ohhhhhh. Things were starting to make more sense. We discussed how they were supposed to be done, and so today -- being Sunday -- I went to my Parents' house and we had actual chicken parmesan there.

I was rather surprised at how simple they are to make.

I'm not sure what is going to happen to the rest of the box of pre-made packets in our freezer. My Mom said she would take them, but I don't know if they'll eat those after they have had these.

So here it is, the thing that should have happened yesterday, but happened today instead.


  • 3-4 boneless, skinless Chicken Breasts
  • 1 egg
  • 1/4 cup Milk
  • 1 cup Panko bread crumbs
  • Salt
  • Pepper
  • Olive Oil
  • 6-8 slices Mozzarella Cheese, sliced lengthwise. It's a good idea to use a cheese slicer so they don't get too thick.
  • 3/4 cup Marinara Sauce
  • 1/4 cup Parmesan Cheese, grated
On medium-high heat a couple of Tbsp oil in a pan, and pre-heat the oven to 350F.
Prepare a baking sheet with foil and a bit of oil so there won't be any sticking. Nobody likes stuck breast on a pan. Nobody.

Pound each breast to 1/2" thick.

Whisk your egg and milk together in a bowl and set aside. In a second bowl mix your bread crumbs with salt and pepper to taste.

Run each breast through the egg mixture and then into the bread crumbs. Press the crumbs on to make a nice thick coating.

Fry the breasts for a couple minutes on each side to get a nice golden brown colour.

Arrange the breasts on the baking sheet. Put two slices of Mozzarella on each breast then put a couple good spoons of sauce over top. Sprinkle with Parmesan cheese.

Bake for about 25 minutes, until chicken is done and juices run clear.

Serve over pasta or with a side of greens.


Interestingly, as The Man was shopping, he was thinking, "She's gonna try these, then she's going to see how she can make them better."

I think I did.

That's my taste on it.

Wednesday, 13 March 2013

Stuffed Spaghetti Pie

I was sitting with an exceptionally cranky baby today watching the food network. Have I ever mentioned how much I love that channel? Even The Kids love it. They don't ask to change it to cartoons or anything like that, because when I am watching it, I just might be getting ideas; they're banking on it, in fact.

Anyway, between shushing The Baby and having her blatantly ignore my efforts at maternal comforting there was a show about cheese. I don't remember the name of the show, or the chef that was hosting it; we can thank The Baby for that.

Chef made this wonderful pie out of spaghetti and cheese, real comfort food. So me being me, I jotted down what I could all the while trying to keep the pen out of The Baby's mouth and the paper out of The Baby's grabby little hands.

Here's what I ended up with, and I must say it's a winner. I really wish I could remember the show so I could recommend you guys watch it.


You'll need:

  • Big handful of Spaghetti, about a pound
  • 1 1/2 cups grated Cheese (I used a mixture of lactose free cheddar, Parmesan  and a bit of regular sharp cheddar, mostly for some colour)
  • Olive Oil
  • A bag of fresh Spinach
  • 6 or so fresh Mushrooms, sliced
  • Sea Salt
  • Pepper
  • 1-2 cloves Garlic, smashed
  • 4-5 Eggs
  • 1 Tbsp of your favourite herb.
Get some salted water boiling in a pot large enough to accommodate your noodles. Once the water is on a hard boil, twirl in the noodles. As they soften, they'll sink down. At which point give them a bit of a stir so that they don't stick to the bottom of your pot.

Meanwhile, put 1 Tbsp olive oil in a pan on medium heat. Toss in your sliced mushrooms, add some salt and pepper and the garlic. As they start to soften, add your spinach. It may be a good idea to do this in parts depending on the size of your pan. If you have a giant pan, then by all means toss in the lot. If you have a regular pan then put in half, once that wilts down a bit add the rest. Reduce the heat and stir occasionally.

Remove from heat when the spinach is as wilted as you desire.

In a large bowl, whisk up your eggs and add the cheese. Put in your herb of choice, I used basil because my Mom gave me a basil plant and I love it. Add a pinch of salt and some pepper, just as you would normally season your eggs.

Once the spaghetti is done, drain and rinse in cold water. This will stop the cooking process and will cool the noodles so that they don't instantly cook the eggs. The noodles should be lukewarm to the touch.

Mix your noodles in the eggy-cheesey mixture thoroughly.

Heat some oil in a pan on medium heat. Once hot put about half the noodle mixture in an even layer inside the pan. Put your filling mixture in the centre and spread out evenly. Leave about an inch of space around the outer edge, so that the pie will close properly.

Put the remaining spaghetti mixture over top and spread out so that you have completely covered the spinach and mushrooms.

Let this cook slowly. 

It's pretty thick, you don't want the bottom to burn before the middle is warm; so keep the heat at medium low.

You can check the bottom with a big flipper, once it starts to get crispy you'll need to flip it over. There are a couple ways you can do this. If you can flip omelettes and veggies, then you may be able to just flip this. I can't really do that, even a little bit, so I took a lightly oiled plate and turned it over, then just slid the giant pasta pie back into the pan so the other side can brown. 

At least that is what I was planning on doing. I used a pan that was bigger than my plate, and therefore the pie was bigger than my plate. So The Man helped and sort of toss-flipped it. It was really close to falling apart and me getting upset, but it worked out. 

After the other side is browned, you can slide it right out of the pan and onto a cutting board. Cut up in wedges like a pie and serve with a side of greens.

You can use any kind of mixture you want. I wouldn't really recommend anything saucy, as it may be too runny at the flip-it-over stage, but you could use slices of pepperoni or other veggies. You could add more cheese, you could shred some cooked chicken and put that in the middle. Basically if it's good on pasta (but not too watery) it'll be good in here.

That's my taste on it.

Friday, 8 March 2013

Way Funner Macaroni and Cheese

The kids were home from school today. Not because The Daughter got kicked off the bus, but because it was a professional day. Generally these days are hectic. The Baby demanding attention, the Kids running around making it impossible for The Baby to sleep, and a chorus of "When's lunch?" "I'm hungry." "We don't have any food." Which is not true. There is always food. They just may not like it.

So today, I kicked them out. We have tons of snow right now and it was relatively warm out, so outside they went. Not an easy task, even with a playground right across the street.

I had planned on just making sandwiches for lunch, but then I got hit with the kitchen stick. I had to make something awesome; and I had just bought the ramekins ... so they couldn't go to waste.

Every kid likes Mac & Cheese, so here's my "Way funner" (as The Daughter put it) spin on an old classic.

This will make enough for 3 ramekins.

Cook 1 1/2 cups small shell pasta to al dente, then drain and set aside.

Pre-heat the oven to 350F.

Tenderize some broccoli. You'll only need about a 1/2 cup, so for this I just boiled it a pan. As soon as it starts to change colour, remove it from the heat, and drain. It's really important that the pieces are small.

Grate 1/3 cup of cheese.

Cut 3 large slices of sandwich mean in half, so you have 6 pieces. I used slices of roast beef. It's super low in salt and fat and the kids love it.

Set out your ramekins and layer as follows:

  • Piece of meat
  • 2-3 large spoons of pasta
  • Cheese
  • Piece of meat
  • Pasta and broccoli bits
  • Cheese
Place your ramekins on a cookie sheet and bake for 5-7 minutes. Then switch the oven over to broil. After another minute or two, take them from the oven, sprinkle over some Parmesan cheese and return them to the oven for another minute or so, until the cheese starts to turn brown. You'll have to keep an eye on them, because they can burn. Fast.

Remove them from the oven and set on small plates. The ramekins will be very hot, so ensure your family is aware of it. For younger kids (7 and under) use a knife to cut it up and warn them (again) that the dish is hot.  

These are relatively plain, so feel free to season them as you wish. But they are perfect for picky eaters, not to mention the idea of getting a whole dish to themselves is pretty cool.


That's my taste on it.

Tuesday, 5 March 2013

Hoisin Chicken with Asparagus

Today was one of those days. A day where The Baby would cry whenever I left the room. A day where The Man left his phone at home, so I had no way of knowing when he was leaving work. A day where The Daughter had misbehaved on the bus; again. A day where The Son was getting picked up early for soccer.

You know, one of those days.

So I wanted dinner that was quick, easy and nutritious.

Marinated and steamed chicken with asparagus on a bed of couscous. 20 minutes from start to finish. Just what I needed for today.

For the chicken today:
  • 2 Chicken Breasts, cut into 1" pieces
  • 2 Tbsp Hoisin Sauce
  • 1 Tbsp Lemon or Lime juice
  • 1 tsp Fresh Ginger, grated
  • 1 clove Garlic, smashed
  • 4-5 large Mushrooms, quartered
Mix all the above ingredients in a bowl and let it marinate for at least an hour.


To make Couscous:
  • 1 part dry Couscous
  • 2 parts boiled Water
It really can't be easier. Bring your water to a boil. In a bowl put your dry couscous. For a family of four, you don't need more than a cup at most. Then add the boiling water, give it a stir with a fork, then cover with a plate and set aside. It only takes about five minutes.

For the Asparagus:
  • Asparagus, washed, woody ends removed.
On the bottom layer of your steamer put the chicken and mushrooms in an even layer. You don't want to double them up because then they won't steam as well.

On the top layer, spread out your asparagus.

Put the lid on and place over your wok on the stove. You'll only need about an inch of water, you want a good steam, but you don't want the super hot churning water to actually touch the chicken. That would boil it. We don't want to boil it.

It takes about 10-12 minutes to cook the chicken, if you have larger bits you may want to check them to be certain. 

Use extreme caution when checking the bottom layer of a bamboo steamer. It does a remarkable job of keeping the steam inside, where we want it; if you open it without protection, it will burn you. Use a towel or oven mitts to remove the top layer.

Plate as desired.


That's my taste on it.

Friday, 1 March 2013

Individually Portioned Lasagnas


We've all been there; we want lasagna.... But we don't want to A) Go out, because that would require something other than sweatpants and yesterday's t-shirt and B) Make one, who needs that much lasagna at once? Well, maybe if you're an orange cat.

Solution? Individually portioned lasagnas that are so ridiculously easy to make it will make you look like a genius to your family. And who doesn't want to look like a genius? I mean, really.

I found this recipe in my notebook, which means I got it from somewhere, but I don't remember where. Also there were a lot of scribbles, so I probably changed a bunch of stuff too. I do that.

Or maybe I got the idea from somewhere and then started looking at a bunch of different recipes and put together the stuff I like. So maybe this one is mine. If it is, then yay me!

  • 6 Lasagna Noodles (I've been making my pasta, so I made the noodles to fit the ramekins)
  • 1/2 lb uncooked Sausage, casing removed
  • 2 cloves Garlic, mashed up and divided
  • 1/4 cup + 1 Tbsp Parmesan Cheese
  • 2 Tbsp fresh Parsley, finely chopped
  • Olive Oil
  • 1/2 cup Onion, finely chopped
  • Salt
  • Pepper
  • 1/2 - 1 cup fresh Mushrooms, finely chopped (amount depends on how much you like mushrooms)
  • 1/2 cup Water
  • 1 x 650mL jar Pasta Sauce of your choice
  • 12 thin slices Mozzarella Cheese
Cook noodles to al dente. Remove from water, ice for 20 seconds. 
Cut each in half and set aside.

Mix sausage meat with 1 clove garlic, 1 Tbsp Parmesan cheese and the parsley.
Divide and make 4 patties, about 1/2 inch thick.

Heat oil in skillet and fry patties until golden brown on each side. You'll only need a couple minutes. Then remove from heat.

In another pan, because multi-tasking is so awesome, fry the onion with some salt and pepper. Once they become transparent add the mushrooms and remaining garlic. Cook for a couple minutes, do not allow it to burn. If it burns it'll be really gross and you won't be happy then you'll have to start all over again. Having to start all over again will make you look like less of a genius. And that's bad.

When the mushrooms are soft, add the jar of pasta sauce and the water. Mix it all about and turn down the head to low. Put the patties in and allow it all to simmer for a bit. 8 minutes-ish. You want the patty to be heated through.

While this is simmering away, pre-heat the oven to 350F.

Remove sauce from the heat and bring it over to your work station. Begin building your lasagnas. In each ramekin put a noodle, 3 spoons of sauce, then the patty, then a slice of cheese, then a bit of parmesan, then a noodle, more sauce, more cheese, the last noodle, more sauce and more cheese.

By now the oven should be heated up. 

Arrange your ramekins on a baking sheet so that any drips will be caught. 

Bake for 8 or 9 minutes, then switch the oven to broil. 

At this point you are going to want to turn on the oven light. If your oven doesn't have a light, which is just silly but my Mom's old oven didn't have a light so I know they are out there, you are going to probably want to get a flashlight. You have to watch these things very closely. 

They will be under the broiler for less time than it takes to read these instructions. Just when the cheese starts to get all bubbly and golden brown, that's when you take them out.

Be extremely careful; the ramekins are hot. This should be common sense. But just to be on the safe side I'll repeat: be extremely careful; the ramekins are hot.

This what it looks like, the ramekin cools down pretty fast; probably because it's only in the oven for 12 minutes at most.
That's my taste on it.

Thursday, 7 February 2013

Bashed Lemon and Dill Chicken

I was going to be making some things that were in the freezer today, but apparently when The Man says, "You cook whatever you want." He really means, "If I don't want what you tell me what you are making, I'm going to vote against it, even though I loved the recipe when you made it before." And bring up unfounded concerns that The Son will have problems with it as well. (What's a little tummy trouble when the food is that good?)

In all fairness, his objection did save us from leftovers; and allowed me to be a bit more inventive than tossing some stuff in a pan. And I guess he does have work tomorrow, so tummy troubles would be unpleasant.

Once I got past my sleep-deprived irritation over the situation and found his objection to be completely reasonable, out came the thinking cap.

So, we're having chicken. Again. How do you feed two adults and a nine-year-old with just two chicken breasts? You get creative.

Today we're having bashed lemon and dill chicken; the recipe is out of my head. Just like the Sour Cherry Sauce was from my head. Ooooo two in a row. You lucky, lucky people.

You will need:

  • 2 Chicken Breasts
  • Sea Salt
  • Cracked Pepper
  • Zest of 1 Lemon
  • About 1 tsp of Dill
  • Olive Oil
Get your pan good and hot, and put in 1-2 Tbsp olive oil.

Lay a piece of parchment paper, twice the length of your board out.
Put the chicken on the paper and season with the salt and pepper. Sprinkle on the dill and lemon zest.
Drag the breast all around and make sure that both sides are nicely seasoned.

Fold the paper up over your chicken, like a little blanket.
Using a rolling pin, smack it a bit. This will bash in the flavour and thin the breasts a little so that cooking goes nice and fast.

Put the breasts in the pan. Cook a few minutes on each side until nicely golden. They shouldn't take very long to cook, and you don't want to overcook them, so if you feel like you need to check, cut open the thickest area and have a peek.


For our dinner, I've sliced the breasts up and laid them on a bed of lemon couscous with grilled carrots and peppers. Brilliant.

That's my taste on it.

Tuesday, 5 February 2013

Yummy Sour Cherry Sauce

There are about a hundred bajillion ways to cook chicken; roasted chicken, BBQ chicken, grilled chicken, steamed chicken, fried chicken, baked chicken, boiled chicken, stuffed chicken ... the list just goes on and on and on. The trick is to keep it interesting; quite the trick indeed.

When I was pregnant I ate a lot of frozen fruit. Berries, grapes, cherries. I wouldn't thaw it because I was also craving ice, so I'd just suck on the frozen berries. My Mom gave me a big freezer bag of frozen sour cherries that I never made it through. Maybe because there were so many of them, maybe because they were super sour. Super, super sour.

So for today's dinner I made a lovely sour cherry sauce to dress the chicken.

  • About 2 big cups Sour Cherries, pits removed
  • 1/8 cup Brown Sugar
  • 2-3 Tbsp Balsamic Vinegar
  • 1 Tbsp Cornstarch, optional
In a small pot, heat the cherries on medium heat. When they start to get soft, mash 'em up with a fork. You can remove the skins if you want, but I didn't.

Add your brown sugar and vinegar and stir.
Adjust to taste as you like.

If you want a thicker sauce, add the cornstarch. Bring to a boil, stirring occasionally. Then reduce the heat.

Allow to simmer for a while. Like any sauce, the more time it has to bond, the better. 

I found that the sauce was still a bit sour, but the brown sugar took the edge off. The balsamic vinegar gave it just a touch of zang and it was really quite nice; especially with all the little chunks of cherry that I left in.

For our dinner, I cut the chicken into strips and steamed them in my wonderful bamboo steamer; best $14 I ever spent. Once they were done, I plated with pan fried (homemade) gnocchi--I'll put up a post for those soon--and some steamed veggies. We drizzled the sauce over the chicken.

The result? Yummy! 

I plan on putting some of the leftover sauce in my oatmeal tomorrow morning. Oatmeal is so boring by itself. It needs a buddy, and I think that this will work well. I guess we'll see.

That's my taste on it.

Also, I just realized how boring my plates are. I really should do something about that.

Wednesday, 30 January 2013

Fresh Salmon Cakes

While not everyone may have had these, I'm sure everyone has heard of them. But do you even know how hard it was to find a recipe that used fresh salmon. After two dozen recipes that called for a can of salmon flakes, I thought I was going to have to just wing it.

So I left my comfort zone website of dependable recipes and did a search. It was scary, the blue links that just appeared, no pictures to go along with the recipes....

Lucky for you, I put myself through that so you don't have to. I went through a few different recipes and picked the things I liked from them and put it all together.

Here's what happened in my kitchen.
  • 2lbs Fresh Salmon, make sure it is boneless.
  • 2 1/2 Tbsp Miracle Whip
  • 1/4 cup Onion, finely diced
  • 2 Green Onion, finely sliced
  • 2 Tbsp Parsley
  • 3/4 tsp Sea Salt
  • Juice and Zest from half a Lemon
  • 2 slices White Bread, crusts removed, finely chopped
  • 3/4 cup All-purpose Flour
  • 3 Eggs, slightly beaten
  • 2 tsp Canola Oil
  • 1 cup Bread Crumbs
  • Canola Oil, for pan frying
Remove salmon skin, discard.
Finely chop salmon, 1/4-1/3" pieces

In medium bowl, mix salmon bits with Miracle Whip, onions, parsley, salt, lemon juice and zest and bread bits.

Form into patties, you should get 8 or 9 easily from this. If patties are really mushy, or don't really hold their shape, add extra bread or bread crumbs a little at a time until you get the consistency you want.

Place on parchment covered baking sheet.
Place in freezer for 15-20 minutes. This helps them to keep their shape while handling, but it's up to you.


Set out three shallow dishes.
  1. The flour
  2. The eggs and 2 tsp oil
  3. The bread crumbs

Heat your canola oil in a skillet on medium heat. Don't let it smoke.
Run the patties through each of your dishes, ensuring that they are fully coated. 

Cook each patty for 2-3 minutes on each side, they should be a nice golden brown. Not a light shade, but you don't want them to be really dark.


When you take them out of the skillet, rest them on a dish with paper towel to absorb some of the oil that is on them.

Serve as a side with some fresh steamed veggies, or you can use them as salmon-burgers with all the fixings.

If you are planning on making these and saving some for another day, they can be frozen after they go through the three dishes of coating. Just put the patties on a parchment covered cookie sheet and freeze. Once they are solid, you can bag them.  To cook from frozen, adjust your cooking time as required. 

That's my taste on it.

Monday, 28 January 2013

Kids in the Kitchen

Cooking great meals can be challenging. Cooking great meals while dealing with kids can feel impossible. I have found that if I get them involved we all enjoy the experience more.

Granted, kids can't do everything. I would never ask my kids to stir a pan of boiling sugar; but they can beat eggs, stir ingredients and fetch different items from the pantry or fridge.

Even if they don't understand what is going on, they can still enjoy the experience. I do my grocery shopping early in the morning and I take the baby with me. She has no idea what is going on, but she understands tone and smiles. Maybe on some level she even understands what I am saying.

So when we are in the produce section, I explain to her how to pick out veggies and which fruits are best and why we don't want bruised apples. I'll hold up two items and let her pick which one goes in the cart. The one that gets the big smile and the grabby hands is the winner.  It may not mean anything now, but getting myself into the habit of including her in our choices and picking the item she shows a preference to (even if they are completely identical) helps me to include her. The sooner I can develop these habits the easier it will be when she is older.

My older daughter and I went to my Mother's house on the weekend and we made bread. She likes to knead the dough, but the best part is punching to down once it has risen.


Kids also need to learn the responsibilities in the kitchen as well. It is very common in our house for the kids to clear the table, unload and reload the dishwasher, and sweep the floor. I can feel my anxiety climb when the kitchen isn't tidy. I'm not saying it has to be polished all the time, but it should definitely be organized.  It is a rare day that there are dishes in the sink by the time dinner is on the table.

It's the little things that count, and where they can help out let them!

Thursday, 24 January 2013

Tasty Boneless Wings

I can't think of a single person who isn't a fan of wings. Hot wings, sweet and sour, teriyaki, you name it. The vast majority of people can't get enough of them. Why do you think there are pubs everywhere with wing night? What could be better?

Boneless wings.

This recipe is great if you are making appetizers or as the main dish. You can have them hot or cold, they are fantastic the next day, or to satisfy that late night craving!

For the Chicken:
  • 2-3 Skinless Chicken Breasts
  • 2/3 - 1 cup Cornstarch
  • Salt and Pepper (just a bit to season)
  • 4-5 Tbsp Canola Oil
  • 3 Large Eggs, beaten
For the Sauce:
You can use whatever sauce you want, you need about a cup for this recipe. But if you are looking for some quick and easy sauces, check out this page.

Cut the chicken into 1" bits or strips, whichever you prefer.

Heat the oil in a large skillet.

Put the chicken and the cornstarch, along with the salt and pepper in a large ziploc bag, and shake it about, making sure each piece is nicely coated.

Pre-heat oven to 325F.

Dip each piece in the egg and then place in hot oil. Make an even layer inside the skillet. 

Cook for a couple minutes on each side.

Remove the chicken from the skillet and put into an oven safe dish.

Cover with sauce.

Bake at 325F for 45 minutes; after 20 minutes turn the chicken pieces over to ensure that both sides are coated with sauce. Check a large piece to make sure it's cooked through.

Plate with whichever sides you want. If you choose a spicy sauce, I'd recommend rice.


If you'd like more than one flavour, then just split the bits into two or more oven safe dishes, and use a different sauce for each.

Super Sauces

In a lot of cases, the right sauce makes the dish. Well, you make the dish, but the sauce makes the dish. The right sauce turns a good meal into a great meal. The wrong sauce ... well, let's not go there; it's not a pretty place for anyone.

Sauce doesn't have to be scary. In fact, it doesn't have to come from a bottle. Why use the store bought stuff, when you can take five minutes, or less, and make your own? Seems silly when you think about it, right?

Here's a few to get you started.

Teriyaki:

  • 2/3 cup Soy Sauce
  • 1/3 cup Honey
  • 1 Clove Garlic, crushed
Sweet and Sour:
  • 1/4 cup Brown Sugar
  • 1/2 cup White Sugar
  • 1/3 cup White Vinegar
  • 2/3 cup Water
  • 1/4 cup Soy Sauce
  • 1 Tbsp Ketchup
Hot and Sweet:
  • 1/3 cup Hot Sauce
  • 1 cup Light Brown Sugar
  • 1 Tbsp Water
  • 2 Tbsp Apple Cider Vinegar
  • 1/4 tsp Salt
You can turn any of these into a dipping sauce by adding 1 or 2 Tbsp cornstarch, heat on medium, stirring constantly until thick.

Have a good sauce? I'd love to try it out. 

Soft Granola Bars

Granola bars are great. Excellent if you're feeling a bit peckish, wonderful when you're on the go, and great for the kids' lunches. But they can be on the pricey side; especially when you have two kids and there are six bars in a box. So, to save emergency trips to the store, why not try your own?

Here is a great recipe that takes hardly any time at all to make.

  • 4 cups rolled oats
  • 1 cup all-purpose flour
  • 1 tsp baking soda
  • 1 1/2 tsp vanilla extract
  • 2/3 cup butter, softened
  • 1/2 cup honey
  • 1/3 cup brown sugar
Mix it all in a big bowl. It's tough to mix with a spoon, so feel free to use your hands.

After it's all mixed up, you can add the fun stuff. You'll want about two cups total of the additive, so you can use as much or as little of the below ideas to make up your two cups. Though they may be a bit crumbly if you are solely using a dry ingredient like nuts.
  • Semi-sweet chocolate chips
  • Almond slivers or other nut
  • Raisins
  • Dried cranberries or other berries
  • Diced apple pieces
Fold in your additive and then press lightly into a parchment lined pan. This makes thick bars in a 9x13" pan, if you want thinner bars, use a large cookie sheet.

Bake for about 18-20 minutes (or until golden brown) at 325F.

Allow to cool for 10-15 minutes before cutting into desired portions. Then allow them to cool completely before you remove them from the pan.

Wrap individually and store in air-tight container, so they don't dry out.

For mine, I used 3/4 cup semi-sweet chocolate chips and 1 cup almond slivers. Before I put them in the oven I sliced up some dates and scattered them about on top, pressing them in slightly so they wouldn't fall off. I found them to be on the chocolatey side, but the kids love them.

That's my taste on it.