Whenever possible I will cite the source; if you find your recipe on here, please email me so I can give you the credit!

Sunday, 17 March 2013

Actual Chicken Parmesan

I've never actually had Chicken Parmesan. I've heard of it, but I've never eaten it.

On Saturday we had a friend over for dinner, which I was supposed to cook; but my back hurt so badly I could barely stand. So The Man went shopping. We decided if he couldn't find something quick at the store, we would just order Chinese food. He brought home salad and asparagus. And pre-packaged chicken parmesans in a box.

You cook from frozen in the oven for 20 minutes or so.  I had no idea.

I was a little disappointed, I had always heard people rave about this dish, but I didn't think they were all that special. I expressed as much.

That is when our friend turned to me and said, "This isn't actually how they are supposed to be done."

Ohhhhhh. Things were starting to make more sense. We discussed how they were supposed to be done, and so today -- being Sunday -- I went to my Parents' house and we had actual chicken parmesan there.

I was rather surprised at how simple they are to make.

I'm not sure what is going to happen to the rest of the box of pre-made packets in our freezer. My Mom said she would take them, but I don't know if they'll eat those after they have had these.

So here it is, the thing that should have happened yesterday, but happened today instead.


  • 3-4 boneless, skinless Chicken Breasts
  • 1 egg
  • 1/4 cup Milk
  • 1 cup Panko bread crumbs
  • Salt
  • Pepper
  • Olive Oil
  • 6-8 slices Mozzarella Cheese, sliced lengthwise. It's a good idea to use a cheese slicer so they don't get too thick.
  • 3/4 cup Marinara Sauce
  • 1/4 cup Parmesan Cheese, grated
On medium-high heat a couple of Tbsp oil in a pan, and pre-heat the oven to 350F.
Prepare a baking sheet with foil and a bit of oil so there won't be any sticking. Nobody likes stuck breast on a pan. Nobody.

Pound each breast to 1/2" thick.

Whisk your egg and milk together in a bowl and set aside. In a second bowl mix your bread crumbs with salt and pepper to taste.

Run each breast through the egg mixture and then into the bread crumbs. Press the crumbs on to make a nice thick coating.

Fry the breasts for a couple minutes on each side to get a nice golden brown colour.

Arrange the breasts on the baking sheet. Put two slices of Mozzarella on each breast then put a couple good spoons of sauce over top. Sprinkle with Parmesan cheese.

Bake for about 25 minutes, until chicken is done and juices run clear.

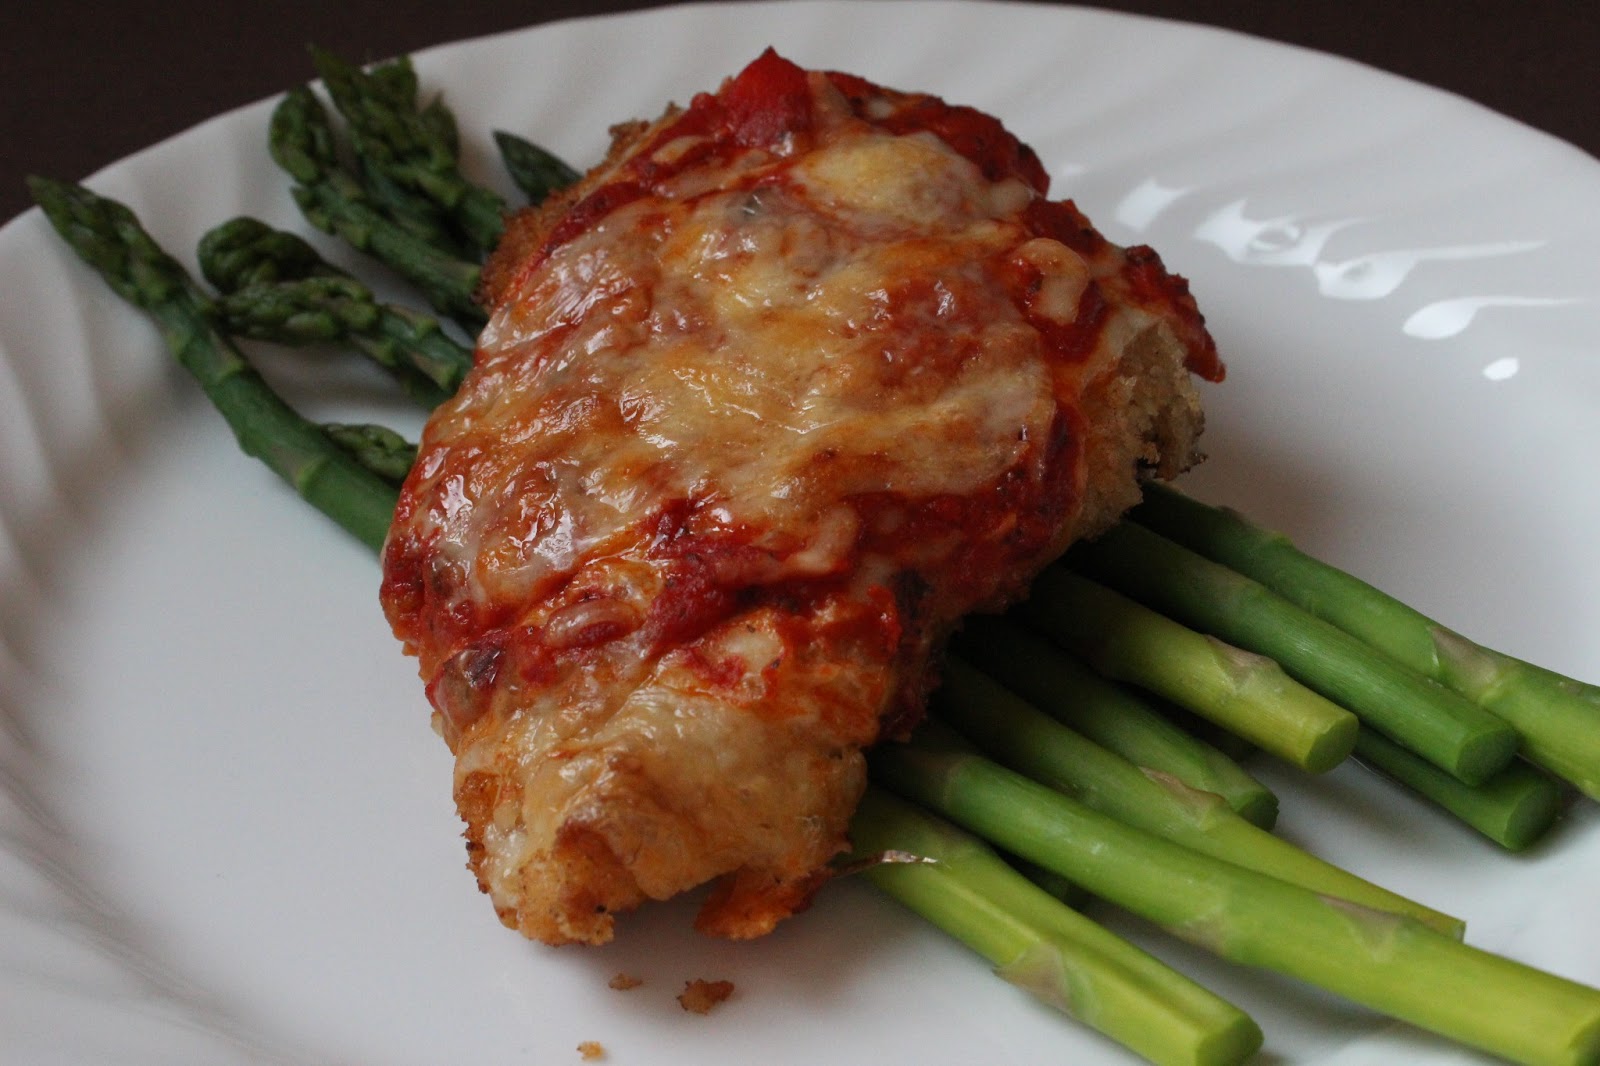
Serve over pasta or with a side of greens.


Interestingly, as The Man was shopping, he was thinking, "She's gonna try these, then she's going to see how she can make them better."

I think I did.

That's my taste on it.

Wednesday, 13 March 2013

Stuffed Spaghetti Pie

I was sitting with an exceptionally cranky baby today watching the food network. Have I ever mentioned how much I love that channel? Even The Kids love it. They don't ask to change it to cartoons or anything like that, because when I am watching it, I just might be getting ideas; they're banking on it, in fact.

Anyway, between shushing The Baby and having her blatantly ignore my efforts at maternal comforting there was a show about cheese. I don't remember the name of the show, or the chef that was hosting it; we can thank The Baby for that.

Chef made this wonderful pie out of spaghetti and cheese, real comfort food. So me being me, I jotted down what I could all the while trying to keep the pen out of The Baby's mouth and the paper out of The Baby's grabby little hands.

Here's what I ended up with, and I must say it's a winner. I really wish I could remember the show so I could recommend you guys watch it.


You'll need:

  • Big handful of Spaghetti, about a pound
  • 1 1/2 cups grated Cheese (I used a mixture of lactose free cheddar, Parmesan  and a bit of regular sharp cheddar, mostly for some colour)
  • Olive Oil
  • A bag of fresh Spinach
  • 6 or so fresh Mushrooms, sliced
  • Sea Salt
  • Pepper
  • 1-2 cloves Garlic, smashed
  • 4-5 Eggs
  • 1 Tbsp of your favourite herb.
Get some salted water boiling in a pot large enough to accommodate your noodles. Once the water is on a hard boil, twirl in the noodles. As they soften, they'll sink down. At which point give them a bit of a stir so that they don't stick to the bottom of your pot.

Meanwhile, put 1 Tbsp olive oil in a pan on medium heat. Toss in your sliced mushrooms, add some salt and pepper and the garlic. As they start to soften, add your spinach. It may be a good idea to do this in parts depending on the size of your pan. If you have a giant pan, then by all means toss in the lot. If you have a regular pan then put in half, once that wilts down a bit add the rest. Reduce the heat and stir occasionally.

Remove from heat when the spinach is as wilted as you desire.

In a large bowl, whisk up your eggs and add the cheese. Put in your herb of choice, I used basil because my Mom gave me a basil plant and I love it. Add a pinch of salt and some pepper, just as you would normally season your eggs.

Once the spaghetti is done, drain and rinse in cold water. This will stop the cooking process and will cool the noodles so that they don't instantly cook the eggs. The noodles should be lukewarm to the touch.

Mix your noodles in the eggy-cheesey mixture thoroughly.

Heat some oil in a pan on medium heat. Once hot put about half the noodle mixture in an even layer inside the pan. Put your filling mixture in the centre and spread out evenly. Leave about an inch of space around the outer edge, so that the pie will close properly.

Put the remaining spaghetti mixture over top and spread out so that you have completely covered the spinach and mushrooms.

Let this cook slowly. 

It's pretty thick, you don't want the bottom to burn before the middle is warm; so keep the heat at medium low.

You can check the bottom with a big flipper, once it starts to get crispy you'll need to flip it over. There are a couple ways you can do this. If you can flip omelettes and veggies, then you may be able to just flip this. I can't really do that, even a little bit, so I took a lightly oiled plate and turned it over, then just slid the giant pasta pie back into the pan so the other side can brown. 

At least that is what I was planning on doing. I used a pan that was bigger than my plate, and therefore the pie was bigger than my plate. So The Man helped and sort of toss-flipped it. It was really close to falling apart and me getting upset, but it worked out. 

After the other side is browned, you can slide it right out of the pan and onto a cutting board. Cut up in wedges like a pie and serve with a side of greens.

You can use any kind of mixture you want. I wouldn't really recommend anything saucy, as it may be too runny at the flip-it-over stage, but you could use slices of pepperoni or other veggies. You could add more cheese, you could shred some cooked chicken and put that in the middle. Basically if it's good on pasta (but not too watery) it'll be good in here.

That's my taste on it.

Friday, 8 March 2013

Way Funner Macaroni and Cheese

The kids were home from school today. Not because The Daughter got kicked off the bus, but because it was a professional day. Generally these days are hectic. The Baby demanding attention, the Kids running around making it impossible for The Baby to sleep, and a chorus of "When's lunch?" "I'm hungry." "We don't have any food." Which is not true. There is always food. They just may not like it.

So today, I kicked them out. We have tons of snow right now and it was relatively warm out, so outside they went. Not an easy task, even with a playground right across the street.

I had planned on just making sandwiches for lunch, but then I got hit with the kitchen stick. I had to make something awesome; and I had just bought the ramekins ... so they couldn't go to waste.

Every kid likes Mac & Cheese, so here's my "Way funner" (as The Daughter put it) spin on an old classic.

This will make enough for 3 ramekins.

Cook 1 1/2 cups small shell pasta to al dente, then drain and set aside.

Pre-heat the oven to 350F.

Tenderize some broccoli. You'll only need about a 1/2 cup, so for this I just boiled it a pan. As soon as it starts to change colour, remove it from the heat, and drain. It's really important that the pieces are small.

Grate 1/3 cup of cheese.

Cut 3 large slices of sandwich mean in half, so you have 6 pieces. I used slices of roast beef. It's super low in salt and fat and the kids love it.

Set out your ramekins and layer as follows:

  • Piece of meat
  • 2-3 large spoons of pasta
  • Cheese
  • Piece of meat
  • Pasta and broccoli bits
  • Cheese
Place your ramekins on a cookie sheet and bake for 5-7 minutes. Then switch the oven over to broil. After another minute or two, take them from the oven, sprinkle over some Parmesan cheese and return them to the oven for another minute or so, until the cheese starts to turn brown. You'll have to keep an eye on them, because they can burn. Fast.

Remove them from the oven and set on small plates. The ramekins will be very hot, so ensure your family is aware of it. For younger kids (7 and under) use a knife to cut it up and warn them (again) that the dish is hot.  

These are relatively plain, so feel free to season them as you wish. But they are perfect for picky eaters, not to mention the idea of getting a whole dish to themselves is pretty cool.


That's my taste on it.

Tuesday, 5 March 2013

Hoisin Chicken with Asparagus

Today was one of those days. A day where The Baby would cry whenever I left the room. A day where The Man left his phone at home, so I had no way of knowing when he was leaving work. A day where The Daughter had misbehaved on the bus; again. A day where The Son was getting picked up early for soccer.

You know, one of those days.

So I wanted dinner that was quick, easy and nutritious.

Marinated and steamed chicken with asparagus on a bed of couscous. 20 minutes from start to finish. Just what I needed for today.

For the chicken today:
  • 2 Chicken Breasts, cut into 1" pieces
  • 2 Tbsp Hoisin Sauce
  • 1 Tbsp Lemon or Lime juice
  • 1 tsp Fresh Ginger, grated
  • 1 clove Garlic, smashed
  • 4-5 large Mushrooms, quartered
Mix all the above ingredients in a bowl and let it marinate for at least an hour.


To make Couscous:
  • 1 part dry Couscous
  • 2 parts boiled Water
It really can't be easier. Bring your water to a boil. In a bowl put your dry couscous. For a family of four, you don't need more than a cup at most. Then add the boiling water, give it a stir with a fork, then cover with a plate and set aside. It only takes about five minutes.

For the Asparagus:
  • Asparagus, washed, woody ends removed.
On the bottom layer of your steamer put the chicken and mushrooms in an even layer. You don't want to double them up because then they won't steam as well.

On the top layer, spread out your asparagus.

Put the lid on and place over your wok on the stove. You'll only need about an inch of water, you want a good steam, but you don't want the super hot churning water to actually touch the chicken. That would boil it. We don't want to boil it.

It takes about 10-12 minutes to cook the chicken, if you have larger bits you may want to check them to be certain. 

Use extreme caution when checking the bottom layer of a bamboo steamer. It does a remarkable job of keeping the steam inside, where we want it; if you open it without protection, it will burn you. Use a towel or oven mitts to remove the top layer.

Plate as desired.


That's my taste on it.

Friday, 1 March 2013

Individually Portioned Lasagnas


We've all been there; we want lasagna.... But we don't want to A) Go out, because that would require something other than sweatpants and yesterday's t-shirt and B) Make one, who needs that much lasagna at once? Well, maybe if you're an orange cat.

Solution? Individually portioned lasagnas that are so ridiculously easy to make it will make you look like a genius to your family. And who doesn't want to look like a genius? I mean, really.

I found this recipe in my notebook, which means I got it from somewhere, but I don't remember where. Also there were a lot of scribbles, so I probably changed a bunch of stuff too. I do that.

Or maybe I got the idea from somewhere and then started looking at a bunch of different recipes and put together the stuff I like. So maybe this one is mine. If it is, then yay me!

  • 6 Lasagna Noodles (I've been making my pasta, so I made the noodles to fit the ramekins)
  • 1/2 lb uncooked Sausage, casing removed
  • 2 cloves Garlic, mashed up and divided
  • 1/4 cup + 1 Tbsp Parmesan Cheese
  • 2 Tbsp fresh Parsley, finely chopped
  • Olive Oil
  • 1/2 cup Onion, finely chopped
  • Salt
  • Pepper
  • 1/2 - 1 cup fresh Mushrooms, finely chopped (amount depends on how much you like mushrooms)
  • 1/2 cup Water
  • 1 x 650mL jar Pasta Sauce of your choice
  • 12 thin slices Mozzarella Cheese
Cook noodles to al dente. Remove from water, ice for 20 seconds. 
Cut each in half and set aside.

Mix sausage meat with 1 clove garlic, 1 Tbsp Parmesan cheese and the parsley.
Divide and make 4 patties, about 1/2 inch thick.

Heat oil in skillet and fry patties until golden brown on each side. You'll only need a couple minutes. Then remove from heat.

In another pan, because multi-tasking is so awesome, fry the onion with some salt and pepper. Once they become transparent add the mushrooms and remaining garlic. Cook for a couple minutes, do not allow it to burn. If it burns it'll be really gross and you won't be happy then you'll have to start all over again. Having to start all over again will make you look like less of a genius. And that's bad.

When the mushrooms are soft, add the jar of pasta sauce and the water. Mix it all about and turn down the head to low. Put the patties in and allow it all to simmer for a bit. 8 minutes-ish. You want the patty to be heated through.

While this is simmering away, pre-heat the oven to 350F.

Remove sauce from the heat and bring it over to your work station. Begin building your lasagnas. In each ramekin put a noodle, 3 spoons of sauce, then the patty, then a slice of cheese, then a bit of parmesan, then a noodle, more sauce, more cheese, the last noodle, more sauce and more cheese.

By now the oven should be heated up. 

Arrange your ramekins on a baking sheet so that any drips will be caught. 

Bake for 8 or 9 minutes, then switch the oven to broil. 

At this point you are going to want to turn on the oven light. If your oven doesn't have a light, which is just silly but my Mom's old oven didn't have a light so I know they are out there, you are going to probably want to get a flashlight. You have to watch these things very closely. 

They will be under the broiler for less time than it takes to read these instructions. Just when the cheese starts to get all bubbly and golden brown, that's when you take them out.

Be extremely careful; the ramekins are hot. This should be common sense. But just to be on the safe side I'll repeat: be extremely careful; the ramekins are hot.

This what it looks like, the ramekin cools down pretty fast; probably because it's only in the oven for 12 minutes at most.
That's my taste on it.

Thursday, 7 February 2013

Bashed Lemon and Dill Chicken

I was going to be making some things that were in the freezer today, but apparently when The Man says, "You cook whatever you want." He really means, "If I don't want what you tell me what you are making, I'm going to vote against it, even though I loved the recipe when you made it before." And bring up unfounded concerns that The Son will have problems with it as well. (What's a little tummy trouble when the food is that good?)

In all fairness, his objection did save us from leftovers; and allowed me to be a bit more inventive than tossing some stuff in a pan. And I guess he does have work tomorrow, so tummy troubles would be unpleasant.

Once I got past my sleep-deprived irritation over the situation and found his objection to be completely reasonable, out came the thinking cap.

So, we're having chicken. Again. How do you feed two adults and a nine-year-old with just two chicken breasts? You get creative.

Today we're having bashed lemon and dill chicken; the recipe is out of my head. Just like the Sour Cherry Sauce was from my head. Ooooo two in a row. You lucky, lucky people.

You will need:

  • 2 Chicken Breasts
  • Sea Salt
  • Cracked Pepper
  • Zest of 1 Lemon
  • About 1 tsp of Dill
  • Olive Oil
Get your pan good and hot, and put in 1-2 Tbsp olive oil.

Lay a piece of parchment paper, twice the length of your board out.
Put the chicken on the paper and season with the salt and pepper. Sprinkle on the dill and lemon zest.
Drag the breast all around and make sure that both sides are nicely seasoned.

Fold the paper up over your chicken, like a little blanket.
Using a rolling pin, smack it a bit. This will bash in the flavour and thin the breasts a little so that cooking goes nice and fast.

Put the breasts in the pan. Cook a few minutes on each side until nicely golden. They shouldn't take very long to cook, and you don't want to overcook them, so if you feel like you need to check, cut open the thickest area and have a peek.


For our dinner, I've sliced the breasts up and laid them on a bed of lemon couscous with grilled carrots and peppers. Brilliant.

That's my taste on it.

Tuesday, 5 February 2013

Yummy Sour Cherry Sauce

There are about a hundred bajillion ways to cook chicken; roasted chicken, BBQ chicken, grilled chicken, steamed chicken, fried chicken, baked chicken, boiled chicken, stuffed chicken ... the list just goes on and on and on. The trick is to keep it interesting; quite the trick indeed.

When I was pregnant I ate a lot of frozen fruit. Berries, grapes, cherries. I wouldn't thaw it because I was also craving ice, so I'd just suck on the frozen berries. My Mom gave me a big freezer bag of frozen sour cherries that I never made it through. Maybe because there were so many of them, maybe because they were super sour. Super, super sour.

So for today's dinner I made a lovely sour cherry sauce to dress the chicken.

  • About 2 big cups Sour Cherries, pits removed
  • 1/8 cup Brown Sugar
  • 2-3 Tbsp Balsamic Vinegar
  • 1 Tbsp Cornstarch, optional
In a small pot, heat the cherries on medium heat. When they start to get soft, mash 'em up with a fork. You can remove the skins if you want, but I didn't.

Add your brown sugar and vinegar and stir.
Adjust to taste as you like.

If you want a thicker sauce, add the cornstarch. Bring to a boil, stirring occasionally. Then reduce the heat.

Allow to simmer for a while. Like any sauce, the more time it has to bond, the better. 

I found that the sauce was still a bit sour, but the brown sugar took the edge off. The balsamic vinegar gave it just a touch of zang and it was really quite nice; especially with all the little chunks of cherry that I left in.

For our dinner, I cut the chicken into strips and steamed them in my wonderful bamboo steamer; best $14 I ever spent. Once they were done, I plated with pan fried (homemade) gnocchi--I'll put up a post for those soon--and some steamed veggies. We drizzled the sauce over the chicken.

The result? Yummy! 

I plan on putting some of the leftover sauce in my oatmeal tomorrow morning. Oatmeal is so boring by itself. It needs a buddy, and I think that this will work well. I guess we'll see.

That's my taste on it.

Also, I just realized how boring my plates are. I really should do something about that.